Back Up Your Hips to Cure Your Feet

Alignment Habits

In an earlier post, I suggested that you have three habits that are critical for the health of your feet. And you have control over the outcomes of each habit. Total control!

  1. The shoes you (choose to) wear
  2. How you move your feet
  3. How you align yourself

Every time I consider this list, I am tempted to declare that one is more important than the others. But, I never do, because they are equally culpable in impacting the tissues of your feet. An entangled lot they are.

Take alignment. Last week, I wrote about how to position your feet, when standing and walking, with the outside edges in a straight line. Feet that do not point straight ahead, but instead point out laterally or diagonally are one of the most effective alignment habits you can have for building a bunion. But there is another alignment habit that is just as prevalent and injurious. Standing with your pelvis shifted anterior of your body’s center of mass. Huh?

The mass of your pelvis is your center of gravity. If you draw a vertical line from heaven to hell, it should go through the exact center of your pelvis. You really could be the center of the universe. “Should” is key here. Wherever the center or mass of your pelvis is, that is where the bulk of your weight will be. If your pelvis is is vertically stacked over your knees, ankles and heels and vertically stacked under your shoulders & ears, then the bulk of your weight will be over the center of your heels, which is structurally the strongest part of your foot and the only place 100% of your weight should be. When your pelvis is shifted or thrust forward of your ankles/heels, your center of gravity, mass of your pelvis, bulk of your weight loads your forefoot, the weakest part of your foot. The tiny bones, muscles, and other tissues of your forefoot are intended for intrinsic movements and supporting the arches of your feet. Bearing weight on the front of your feet can contribute to plantar fasciitis, bunions, bone spurs, hammertoes, flat feet, metatarsalgia (pain at the base of the toes), and neuropathy.

There are other reasons for vertical stacking of your joints, all of which I will write about in more detail another time.

  • minimizes the forces that cause joint degeneration
  • signals your pelvis and femurs (your “hips”) to build more bone density, making them stronger and less susceptible to fractures

Getting Your Hips Back

My yoga students attest to the broken recordness of my cuing. “Hips back, hips back, hips back.” “Get your hips back over your heels.” “Your hips should be stacked over you knees, which should be stacked over your ankles.” “Keep your pelvis from shifting forward.” “Hips back, hips back, hips, back.” I never tire of saying it.

What and where are your hips anyway? Your hip is not a bone. Your hip is actually a joint made from your pelvis and femurs. Basically, the top of your femur (greater trochanter) fits into the socket or acetabulum at the side of your pelvis. When you place your hands on you “hips,” you are actually placing them on the top of your pelvis.

Here is how to get your hips back:

  1. Stand with your feet aligned – outer edges are straight. See building a bunion.
  2. Shift your weight back, all of it, into the center of your heels.
  3. Press the balls of your feet (not your toes) into the mat, without bringing your weight forward.
  4. With your hands on your hips, the top of your pelvis, gently guide your pelvis back** until your hip joint (about where the side seam of your jeans lies) is stacked directly above the side of your knee, which is stacked directly above your the side of your ankle at the maleolus bone, which is directly over the center of your heel.

**It is critical that you don’t rotate your pelvis back (tuck your tail) or forward (Beyonce your butt), but merely shift it back.

When you back your hips up, it may fee like your butt is sticking out behind you. That’s good. That’s where it should be, behind you. It’s why we call it your rear.

The images below will give you a visual of what it looks like to have your hips thrust forward (losing) or properly backed up (winning). This is from one of my favorite books from my favorite biomechanists Katy Bowman. Her book Every Woman’s Guide to Foot Pain Relief: The New Science of Health Feet is my go-to source for most things feet and is absolutely relevant for men too. In fact, I wish she had named it “Every Human’s Guide…” because other than a few strictly female bits, it is applicable regardless of gender.

Pelvis forward of center of gravit

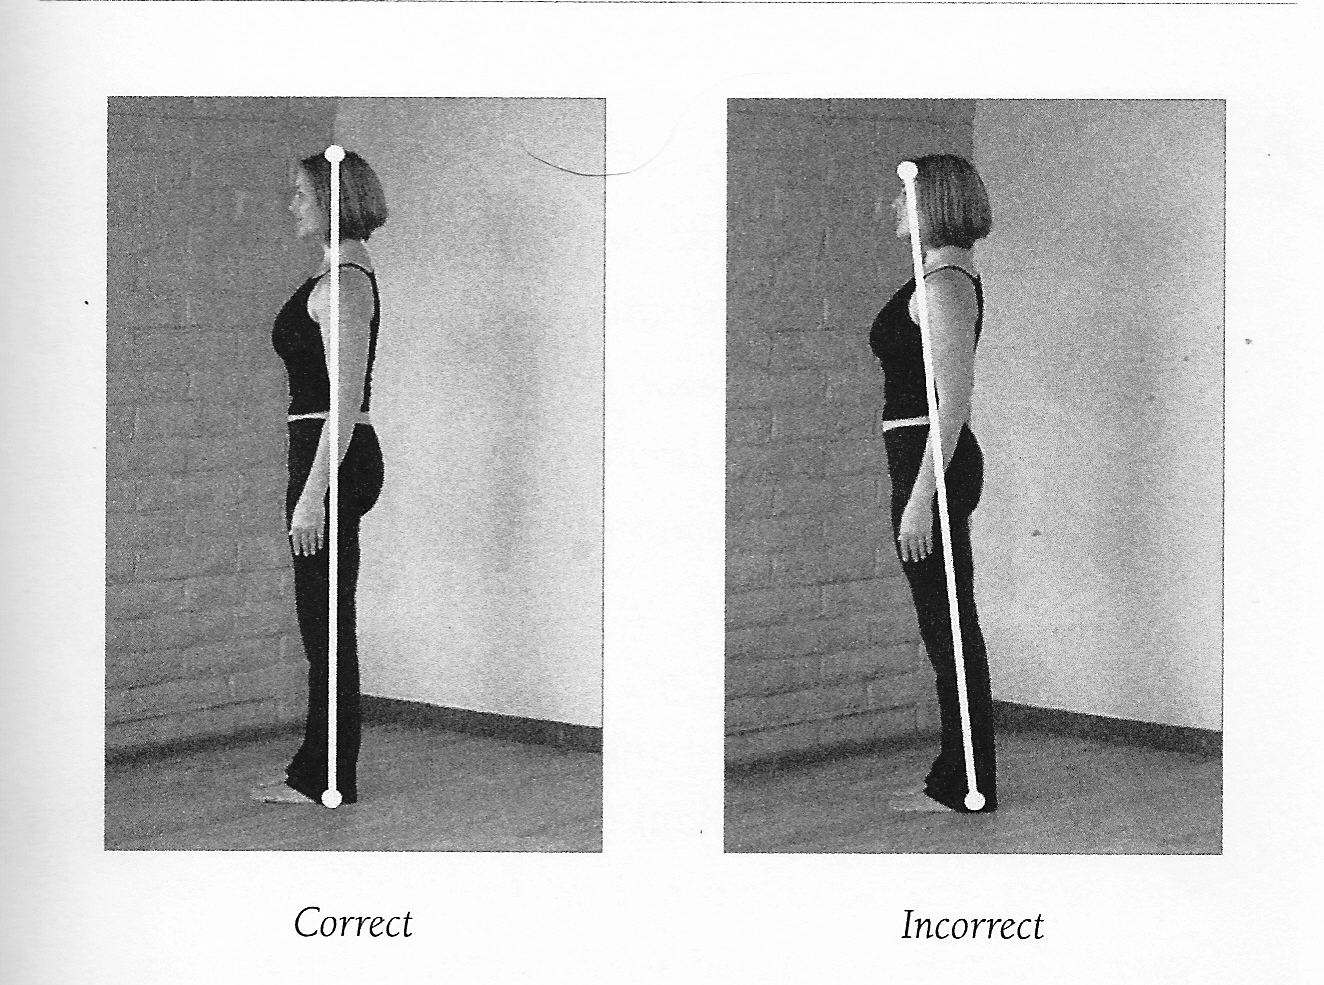
Pelvis forward of center of gravity

In the image above, The stance on the left shows Katy’s center of gravity, her pelvis, is where it belongs. In contrast, she is definitely not vertically stacked in the stance on the right.

hipsback10002

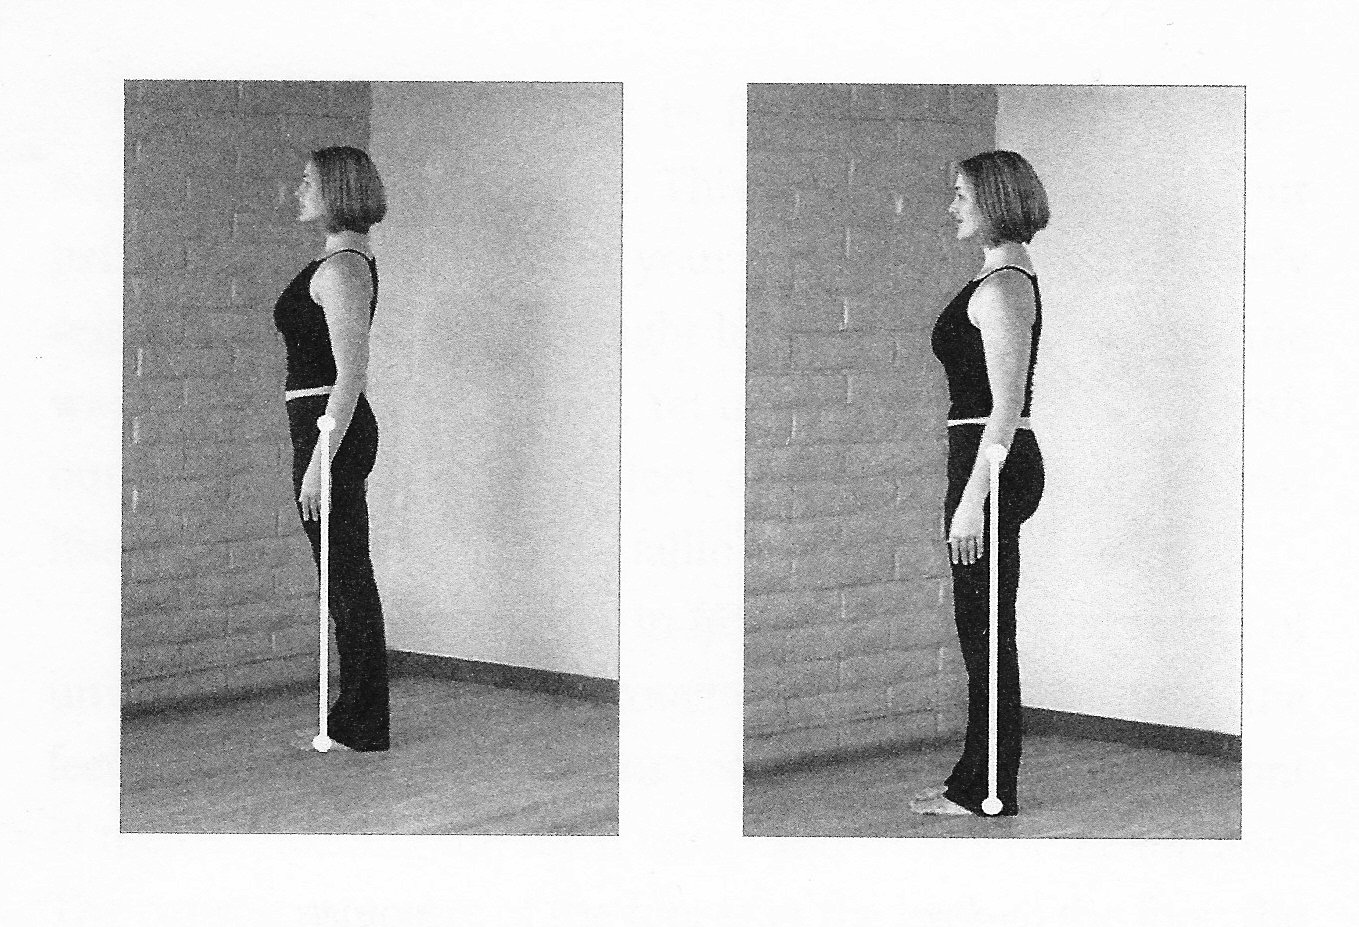
In the image above, Katy’s pelvis is clearly shifted forward until the bulk of her weight is over her forefoot, which, overtime, could have disastrous consequences for her feet. On the right, her hips are backed up and her pelvis is over her knee, ankles, and heels.

hipsback10003

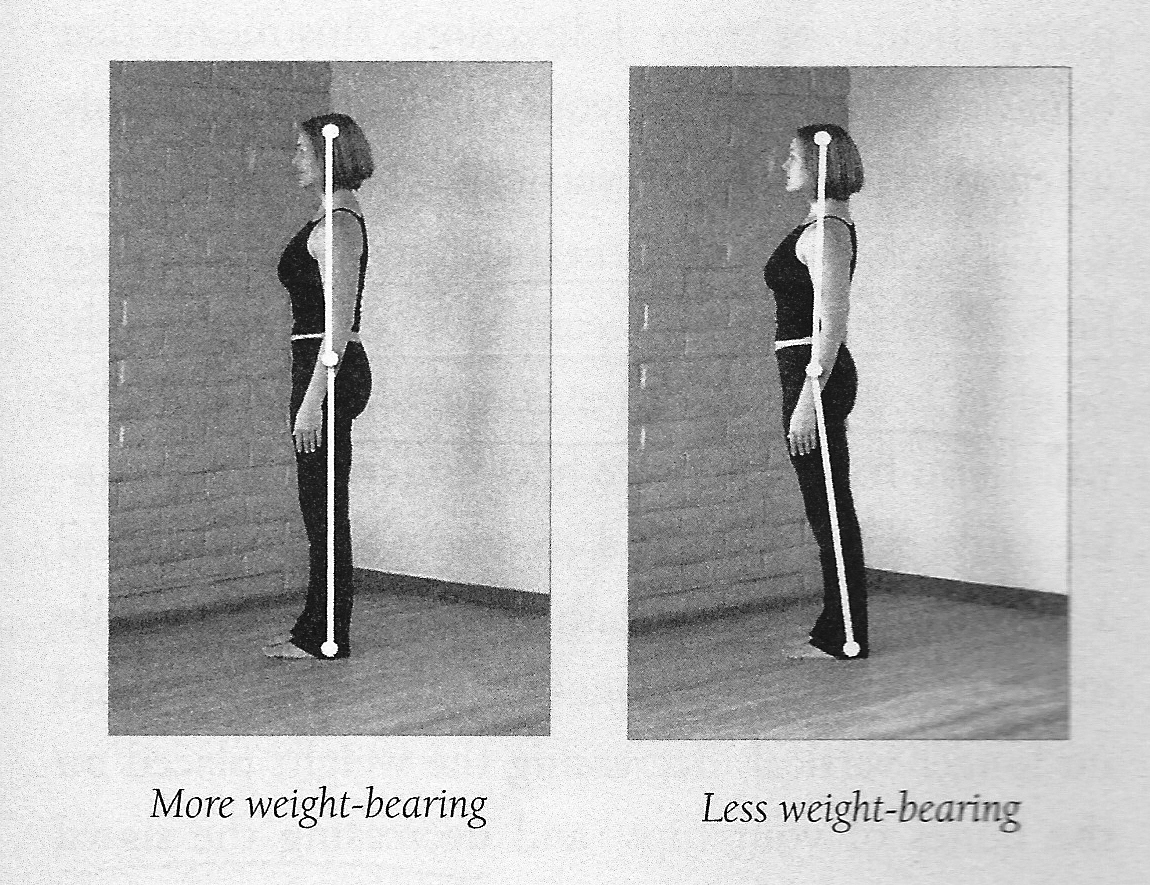
In the image on the left, Katy’s alignment is signaling the bone cells in her hips to build more bone density because the weight of her torso is stacked vertically. Her stance on the  right, overtime, will prove degenerative to her joints.

I’ll leave you with one final thought. Backing up your hips is a practice. It takes intention, practice, and time to instill this new alignment habit. Start today.

Namaste, Michele

Prop Review – Alignment aka Toe (Spreading) Socks

If you’ve been to my Facebook page, you’ll have seen toe socks on my cover photo. I’m not referring to socks with little glove fingers in them, but socks like this:

029

Alignment socks are a great way to passively stretch your toes after they’ve been casted in shoes all day, particularly shoes with tight toe boxes that don’t allow your toes much mobility. Tight toe boxes don’t have to feel tight. Remember the tracing I made of my foot from matting paper earlier this week? I was unable to slide it into one of my favorite shoes because the stiff card stock would not yield or deform the way my foot does when I slide it into my shoe. This tells me that my toe box, even though it feels comfortable, does not have enough room to house my foot in a healthy manner. Toe boxes that don’t allow full spreading of your toes will cause the muscles that bring your toes together (adduct) to be tight and weak and those that spread them apart (abduct) to lose function.

When you don’t have time to perform the manual toe stretching and strengthening exercises I’ll be sharing on this blog, or you’ve already done them, then put on a pair of alignment socks. You can wear them for hours, while sitting or sleeping (not really meant to be walked in), to separate, stretch, and properly align your toes.

The Original Foot Alignment Socks can be had here for about $20

For quite a bit less money, around $6.00 a pair, you could try these from Amazon

Women’s Large/Men’s

Women’s Medium

Yep, I’ll be needing these socks after wearing these shoes…

cut out tracing of my foot

cut out tracing of my foot

does not fit into my shoe.

does not fit into my shoe.

Namaste, Michele

How to Build a Bunion – Part 1

A bunion is one of the most common foot deformities in adults. It presents as a lateral protrusion of the big toe joint. Inflammation with reddening and swelling, pain, and numbness are often present. In more severe cases, the toe deviates medially toward the other toes, sometimes going completely sideways and moving under them. Bunions impair weight bearing and balance, increase the risk of falling, and worsen physical performance and quality of daily life.

If you are sitting, stand up, walk across the room, come back and remain standing. Really, do this before you read further or you might influence the results.

Now, look at your feet. Do they look like this?

Feet definitely not pointing straight ahead.

Feet definitely not pointing straight ahead.

So what, you might ask? Why does it matter? I counter with a question. Would you want these wheels on your car? I didn’t think so. Our feet, like the wheels on a car, are meant to move forward in a straight line with the toes pointing straight ahead. When your car wheels are out of alignment, it causes improper wear on the tires and problems with steering, vibrating, and pulling of the car to one side. When your feet are misaligned, they too experience improper wear, often in the form of bunions.

If your feet look like the image above, then you are building a bunion every time you take a step. This happens because of the compensatory movements your ankle has to make to keep a foot that is pointing diagonally, heading forward instead. Your ankle/foot complex should be moving back to front.  But your stance is causing an unnatural rocking side to side of your ankle, which is causing a rolling of the foot from outside to inside, which makes you land on and toe off from the side of your big toe rather than from the its proper and padded bottom. Repetitive landing on the bony side of your toe will signal your bone making cells (osteoblasts) to shore up and increase bone density by layering on more bone on the side of your foot. This is how you make bones more dense. Great for hips, not so much for the side of the big toe.This is how you build a bunion.

How should your feet look? How should you align them in standing and walking? More like this:

Feet pointing straight ahead

Feet pointing straight ahead

To align your feet, use their outer edges as markers (not where your toes are pointing)

  1. Stand one foot on the edge of a yoga mat, floor board, or any straight edge
  2. Line up your outer ankle bone (maleolus) with the edge
  3. Line up the center of your pinky toe with the edge
  4. Try to match your other foot to your straight foot

You may discover that once you align the outer edges of your feet that your toes appear to point inward. This is to be expected as your toes have been pulling medially all these years to help your car feet go straight, and have thus re-aligned themselves for this task. Over time, with proper alignment and improved muscle tone (exercising your toes with FootLove), this will improve.

Namaste, Michele

What does Plantar Fasciitis, your down comforter, and your sleep position have in common?

Biomechanist Katy Bowman introduced me to the concept of casting. When you cast something, you immobilize it and its ingredients adapt to the shape of the cast. It happens in metals, clays, and body tissues. If you’ve ever broken a bone and worn a cast, you know that when you finally remove the cast, your tissues – bone, muscles, tendons, ligaments, fascia, even skin – have adapted to the position they have been held or casted in. We cast our bodies in many ways and with many apparati.

Take feet, for example. Most human feet are casted into the shapes of their shoes for many hours a day and have been that way for almost as many years as their operators have been alive. If your shoes have a tight toe box, are thick and rigidly soled, and have positive heels (any amount of heel elevation relative to the toe) then you have been casting your feet into a tight, weak, motor and sensory deprived mess. Maybe its what brought you to this blog.

Another way we cast our feet, which is particularly problematic for plantar fasciitis (PF), is by keeping them in plantar flexion aka “pointer” flexion, pointing our toes like a ballerina, when we sleep. This position is known to aggravate PF. Try this. Get in bed, lie on your back, pull on your heavy winter covers and notice what position your feet are in. They will be pointing. Now, pull the covers off of your feet and notice how they come into a more neutral position, not quite dorsiflexed (aka flexing your foot or ankle – opposite of pointing), but less plantar flexed. Podiatrists will sometimes prescribe an orthotic called a night splint that you wear to keep your foot in dorsiflexion. But a less extreme and more comfortable alternative that you might try if night splints are not for you is simply donning soft, warm socks (sadly, also a cast, but less problematic than plantar flexing) and sleep with your feet out of the covers.

If you turn over onto your belly, regardless of whether your feet are covered, your feet will automatically be in plantar flexion – again, bad for PF. If you are a belly sleeper and have PF, try to cultivate the habit of sleeping on your back or side. Start out your sleep this way and move onto your back/side whenever you naturally wake up during the night.

Namaste, Michele

Party Games with Your Feet – January 7, 2015

How Big is Your Foot? How Big is Your Shoe?

To play this simple, but exciting game you will need:

  • a foot
  • a shoe – use the one you wear the most
  • paper
  • pen or marker

1. Trace an outline of your foot onto the paper. Be especially neat and precise around the toe box, tracing each individual toe.

2. Trace an outline of the toe box of the shoe over that of the outline of your foot. You have to be careful here to get the actual toe box size because many shoes, especially athletic shoes, have a flared edges on their soles that make the footprint seem bigger than it is. Try turning the shoe over and tracing only the outline of the actual toebox that contains your foot. Alternatively, you could lay your shoe on top of your drawing if your shoe does not have a flared edge.

You lose if your toe box is the same size or smaller than your foot outline, which means that your toes are cramped, the muscles between your toes are tight and weak, and you probably have a bunion in the making. Oh, and your feet smell too.

You win if your toe box is bigger than your foot outline, which means it allows your toes to spread inside your shoes.

Here’s how I made out.

Barefoot tracing

Barefoot tracing

Loser

Loser

Loser

Loser

Winning!

Winning!

Namaste, Michele

Barbie Foot

Remember the bit about our feet having 33 joints each? And the other bit about how we rarely use all those joints because our feet are often casted in shoes, walking on flat uninteresting surfaces, or not moving at all? This exercise, Barbie Foot, is great for mobilizing your foot joints, improving blood flow (aka tissue food) and cellular waste removal, maybe even lowering your blood pressure!

A video of Barbie Foot is available on my Facebook page.

Sit on the floor with your legs extended out in front of you – in Dandasana for the yogis/yoginis out there. If you are not used to sitting on the floor, it may become fatiguing or otherwise uncomfortable, so try sitting with your back against a wall or on a bolster or stack of folded blankets. Place your hands on the floor alongside your hips for additional support, or, if you are working on sitting on the floor unsupported (you are, aren’t you? aren’t you??), you can place your hands in your lap. Your feet should be in the same lines or channels as your pelvic bones (aka hip bones) – in other words, not too close or not too far from each other.

Foot Position 1 – Neutral or Dorsiflexed Ankles
Start with vertical feet so that the tips of your toes are facing the ceiling. Your feet will be in the same position as if you were standing. This is also called dorsiflexion of the ankle.

Barbie Foot Position 1 Dorsiflexion

Barbie Foot Position 1 Dorsiflexion

Foot Position 2 – Balls Forward
Press the balls of your feet forward but keep your toes pulling back towards your shins. This is a plantar flexion of the ankle, but without the toes going forward. The joint articulation in the ankle is same as if you were “pointing your toes” only in this position the whole foot points forward except for the toes.

Barbie Foot Position Two - balls forward

Barbie Foot Position Two – balls forward

Foot Position 3 – All Toes Forward
Flex all of your toes forward. This is a true plantar flexion or as I sometimes call it “pointer flexion.”

Barbie Feet Position 3 - all toes forward

Barbie Feet Position 3 – all toes forward

Foot Position 4 – All Toes Back
Return to Foot position 2, balls forward with all the toes coming back towards shins.

Barbie Foot Position Two - balls forward

Barbie Foot Position Two – balls forward

Foot Position 5 – Foot Back
Bring your foot back to the starting position and repeat.

Here is the flow, starting from a neutral, dorsiflexed ankle. Move slowly, lingering in each position. The whole point is to articulate the joints in your feet through their full ranges of motion.

  1. Balls (of your feet, people) forward
  2. All toes forward
  3. All toes back
  4. Foot back
  5. Repeat

So what was that about feet and blood pressure? In a nutshell, when your move your feet (or any part of you), your muscles cause the blood that is moving under pressure through your arteries to move into your arterioles and on into your capillaries where it nourishes tissues. This opening of the capillaries will lower the pressure of blood flowing through your arteries and will save your heart from having to work so hard. True story.

Namaste, Michele

Plantar Fasciitis: What we know; what we can do about it – January 5, 2015

Plantar fasciitis (PF) is one of the most common causes of heel pain. It affects both sedentary and athletic people. Classic symptoms include severe pain upon getting out of bed in the morning or after prolonged periods of rest. Pain usually improves with movement, but can get worse with long periods of standing.

soleoffoot1

What’s in a name? The plantar fascia is a thick fibrous band of tendons (technically not fascia) called aponeurosis that attaches at the inner heel, run along the bottom of the foot, and attaches at the base of the toes. While long thought to be a condition of acute inflammation, current thinking suggests that it is a chronic disease with evidence of tissue degeneration. Thus the term “plantar fasciosis” has been introduced. It is difficult to treat because of limited understanding of the mechanism by which the body heals chronic degeneration.

Anatomical risk factors include obesity, flat feet, high arches, and a shortened achilles tendon. Biomechanical risk factors are overpronation (inward roll of foot), limited ankle dorsiflexion (“flexing toes to shin), weak intrinsic muscles of the foot, weak plantar flexor muscles, and poor biomechanics & alignment. Environmental factors put us at risk too, such as deconditioning (being on bedrest or sedentary), hard surfaces, walking barefoot, prolonged weight bearing, inadequate stretching, and poor footwear.

I’ll focus on those biomechanical and environmental factors that can be addressed conservatively through yogasana, plantar fascia-specific stretching, alignment, and conditioning, aka FootLove Yoga.

FootLove Yoga and January’s Happy New Feet posts can help with:

  • Overpronation of the foot – may be improved by the Strong Yoga Foot (upcoming blog post)
  • Limited ankle dorsiflexion – may be improved by calf stretching (upcoming post)
  • Weak intrinsic muscles of the foot and weak plantar flexor muscles – can be strengthened by many of the exercises I’ll be sharing in the coming weeks.
  • Poor biomechanics (how you move) and alignment are two of three habits that have the most significant impact on the tissues & health of your feet – I will convey to you some fundamental changes you can make in how your move and align yourself that, overtime, could make a significant difference in your experience of PF.
  • Poor footwear or, rather, poor shoe selection is the third of the three habits that impact your feet – Get ready for a post on this sensitive subject. I AM NOT THE SHOE POLICE. Well, kinda I am. I DO NOT HATE SHOES. Not that much really.
  • Deconditioning of the foot, which may or may not be associated with overall deconditioning – everything we do in January will be with the aim of conditioning the feet.
  • Hard surfaces & walking barefoot will be explicitly addressed as part of conditioning the feet.
  • Prolonged weight bearing (which is a reality for many jobs) will be addressed with alignment. If you have to stand for long periods of time, there are ways to align and move yourself that will help.
  • Inadequate stretching – many of the FootLove exercises will stretch intrinsic & extrinsic foot muscles, calves, and hamstrings.

Since plantar fascia-specific stretching has the best statistically significant long-term results as compared to other treatments like anti-inflammatories,  corticosteroid injections, and most orthotics, let’s start with one of these evidence supported stretches.

Manual plantar fascia stretch with massage. Extend (stretch back) your toes with your hand and massage the plantar fascia crosswise. Stretch and massage your foot for a few minutes before taking your first steps after sleep or prolonged rest.

PF manual stretch with massage across the PF

PF manual stretch with massage

PF manual stretch with dog assist

PF manual stretch with dog assist

Some of the research I looked at.

Plantar Fasciitis: A Concise Review
Schwartz EN, Su J
Perm J. 2014 Winter;18(1):e105-7.

Plantar Fasciitis
Cutts S, Obi N, Pasapula C, Chan W.
Ann R Coll Surg Engl. Nov 2012; 94(8): 539–542.

Namaste, Michele

Random, Weird, Playful, Freaky, Wiggly and Varied are the Movements Your Feet Should be Making – January 4, 2015

Our feet have 26 bones and  33 joints each. A whopping 25% of our muscles and nerves are dedicated to our feet and ankles. It’s a lot of real estate. The bottoms of our feet have thick layers of connective tissue called fascia (actually, plantar fascia is a misnomer in that its tissues are aponeuroses or broad, flat bands of tendons – but I’ll accept fascia). Fascia responds well to varied movement, or what I now call “movement nutrition.” Most human feet are severely malnourished, some near death. If you are usually wearing shoes, not moving much, and the movements you do make are repetitive and on a flat, hard surfaces, its the equivalent of only ever eating gruel. What is gruel, btw?  Over the course of the month, you will learn many exercises that will increase movement nutrition for your feet.

Here is one. Sit on a chair on your sitting bones (not your tailbone). Place a bolster, cushion, or pillow on the floor under your bare feet. Move your feet in random, weird, playful, freaky, wiggly, and varied ways – the stranger and more surprising the better. Stretch the tops, bottoms, sides of your feet; contract your soles; flex, extend, spread, and wiggle your toes; press all parts of your feet into the bolster and roll them around in all directions.

weirdfeet2

weirdfeet

This is the chair I was sitting in. I include it cause its cool.

This is the chair I was sitting in. I include it cause its cool.

Do this for at least five minutes. Every day. Namaste.

Can You Train Your Feet to Love the Cold? – January 3, 2015

Heavy boots, wool socks, heated buildings, and heavy blankets are adaptations that keep us not only comfortable but alive during winter. Unfortunately, our behavioral adaptations to cold work so well that our physiological adaptations are blunted and the sensory nerves of our feet muted.

Can you train your feet to love the cold or at least respond to it with less strain?

Yes. It turns out you can. Thermal adaptation, the ability of the body to adjust to temperatures such as repeated exposures to cold, takes about two weeks. In studies that repeatedly exposed human feet to cold temperatures (usually 30 min in cold water), after two weeks test subjects experienced increased vasodilation (more blood flow), increased skin temperatures, and reduced pain and tactile sensitivity.

Today’s foot exercise.

  1. Take off your shoes & socks
  2. Stand outside for 1 minute
  3. Repeat several times throughout the day.
  4. Do it again tomorrow, but increase your time to 2 minutes, and repeat several times.
  5. Keep exposing your feet daily for increasing periods of time for 2 weeks.

What you feel, your thermal sensation of cold, is both a sensory and psychological experience. The sensation of cold is formed in the somatosensory cortex of your brain and is determined by things like the number of cold thermoreceptors in your feet, the size of the area exposed, and the intensity of the stimulus.

The psychology piece is really interesting. In my experience, as my pain and tactile sensations decreased, my psychological aversion to cold also decreased and my feet began to feel vibrant and alive during the exposures. I now look forward to the sensate clarity the cold brings to my feet. Since I don’t have the equipment to measure the various physiological adaptations my feet may have made, all I have to go on is sensation and psychology – and both say I’m adapting to the cold!

A caveat – seek medical advise if you suffer from Raynauds or chilblaines or have any other condition for which cold exposure would be contraindicated. And use common sense – don’t stand out there like a dumb bunny for too long and get frost bite!

If you want to read one of the studies I looked at, check out:

Human Cold Exposure, Adaptation and Performance in a Northern Climate
Trainability of Cold Induced Vasodilation in Fingers and Toes

Subscribe to this blog or follow me on Facebook to stretch, strengthen, and mobilize your feet in 2015!

Namaste, Michele

These Feet Were Made for Walking… – January 2

Our feet evolved primarily for walking on varied terrain with hills, bumps, divets, sharp rocks, smooth stones, roots, holes, sand, dirt, grasses, leaves, brambles, water, slick, sloggy, hard, soft  – deforming their 33 joints in a nearly infinite number of positions while naked. Our feet did not evolve to wear thick, rigid, tight, positive heeled shoes while walking on hard, flat artificial surfaces. Our feet are not happy. Our feet could be so much more.

A little science bit on the gait cycle. While walking looks easy, it is an extremely complex and coordinated event. When we walk, the following four distinct events occur during the stance phase, when the foot is in contact with the ground.

  1. Heel strike (HS)
  2. Foot flat  (FF)
  3. Heel rise (HR)
  4. Toe off (TO)

Walking with shoes on flat surfaces mutes/blurs these distinct actions, resulting in gait patterns that look more like stomping or shuffling.

To get your feet walking optimally with maximum joint involvement, try this. Remove your shoes and slowly exaggerate each action in the gait cycle. It’s OK to do this on carpet if you are not used to going barefoot. If you have rugged feet, try this outside on grass. Concentrate first on your right foot only, letting the left foot come along for the ride. Then concentrate on your left foot. Then both feet. If you feel like you are walking the bridal march, you are doing well.

  1. As you step your right foot forward, gently land your heel on the ground (heel strike)
  2. Slowly allow the remainder of your foot to make contact with the ground, articulating one joint at a time as you lay your foot down. (foot flat)
  3. Rise your heel off the ground, again articulating each joint until you are on the ball of your foot. (heel rise)
  4. Push your toes firmly away from the ground (toe off)

In the kind words of Thich Nhat Hanh, as you walk, “kiss the earth with your feet.”

Subscribe to this blog or follow me on Facebook to stretch, strengthen, and mobilize your feet in 2015!

Namaste, Michele